Friday 26 April 2013

Dynamic 2D Shadows

This article is based on the following theories and samples. My implementation was merely ported across to C++/DirectX for learning purposes. All credit goes to the authors.

Recommended Reading:

What are dynamic 2D shadows

Monaco: What's Yours is Mine
They are an aspect of lighting for 2D games (sidescrolling, top-down, etc.) where as the light source moves through the environment, shadows are updated and cast in real-time. As such, you can get some quite impressive effects as you walk past a series of columns for example.

Of course, this aspect does not need to be used just for lighting specifically. Monaco is a game which uses this concept for the player's field of view, such that you can only see the parts of the level that your character actually has line of sight with.

How you could implement it

There are two main aspects to consider when using this approach. The first is the concept of Render to Texture, where instead of rendering to the usual backbuffer you render to a separate texture; and the second is Texture Blending, where you control how multiple textures are blended together for different visual effects. It's important that you have a basic grasp of these techniques, so I'd recommend reading up on them if you're not too sure what they mean.

Our game rendering code is broken up into three phases. First we render what's known as a lightmap to a separate render texture, then we render our level geometry to the backbuffer and finally we then blend the backbuffer with the lightmap to create our final scene. Since creating the lightmap requires the most work, it will be the focus for this article.

Creating a lightmap

A lightmap is simply a map of the light (and consequently dark) areas in a scene. In our case, it's simply a coloured texture which we combine with our scene, where the dark areas of the lightmap are rendered in ambient lighting and the bright areas are rendered according to their colour.
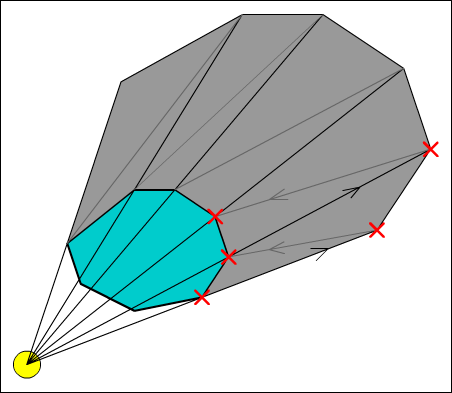
Creating shadow primitives
In order to create a light map, we need to create geometry for our shadows. For each light and object pair, we loop through each of the object's faces and compare whether it is facing the light source. This is done by taking each face's normal and using the dot product to compare it to the direction of the light (greater than 0 means it's facing the light and less than 0 means it's facing away).We then take the points which make up these faces and project them away from the light source to create a shadow primitive.

If we were to simply loop through each light, render a simple feathered circle texture for each and then render a black primitive behind each of our objects for shadows, we wouldn't be able to blend multiple light sources together (as the black would override any other colour already there). As such, in order to create our lightmap, we're going to use a little trick to control what parts of the light texture are rendered.

First, we render the shadow primitives to the texture's alpha channel as 0. The alpha channel controls how transparent a texture is, and since the lightmap will always be completely opaque we can use it as a form of temporary storage instead. To do this in DirectX 9, we set the following render state parameter before drawing our primitives.

device->SetRenderState(D3DRS_COLORWRITEENABLE, D3DCOLORWRITEENABLE_ALPHA);

Then we render our light texture using a blending operation where the amount of light texture added depends on the target's alpha. For DirectX 9, the way we achieve this is by setting the device's render state blending parameters before drawing our light texture. We also reset the ColorWriteEnable parameter so we can render the light texture's RGB values.

device->SetRenderState(D3DRS_COLORWRITEENABLE, 0x0000000F);
device->SetRenderState(D3DRS_SRCBLEND, D3DBLEND_DESTALPHA);
device->SetRenderState(D3DRS_DESTBLEND, D3DBLEND_ONE);

A lightmap created from 6 lights
Source Blend is the factor for the texture we're rendering (light texture), where as Destination Blend is the factor for the rendering target (lightmap). Setting the Source Blend Factor as Destination Alpha means that the amount of the source texture used is dependant on the render target's alpha. Setting the Destination Blend as ONE means that 100% of the render target is always used. By default, the Blending Operation is set to ADD, which means that the source factor is added to the desination. As such, this means that our new light value is added to any existing value at that position, rather than overwriting it.

If we repeat this process for each light we can create a lightmap containing all of our lights, correctly shadowed and blended where two lights meet. Don't forget to clear the alpha channel between drawing each light so that our shadow data doesn't carry across into the following lights. Unfortunately both the Clear() and ColorFill() methods in DirectX ignore the ColorWriteEnable parameter, so you have to manually render a full-screen quad if you want to clear the lightmap's alpha channel.

Combining the lightmap with the scene

After rendering your scene geometry, we can then combine it with the lightmap to form the final lit scene. To do this, we use another blending operation to control how much of the scene colour we render. Specifically, we render our target texture where the amount of target texture used depends on the lightmap's colour or RGB values. To this in DirectX 9, we set the device's render state blending parameters to the following values.

device->SetRenderState(D3DRS_SRCBLEND, D3DBLEND_ZERO);
device->SetRenderState(D3DRS_DESTBLEND, D3DBLEND_SRCCOLOR);

Scene combined with lightmap
In this case the Source Blend Factor is ZERO, meaning that none of the source texture is used. The Destination Blend Factor is set as SRCCOLOR though, which means that the RGB components used for the destination are the same as those in the source texture. This means that any areas in a scene where the lightmap is red for example will only render their red components.

An interesting thing to note is the effects of multiple light sources. In the picture shown, you can see how some of the shadows from the blue light are rendered as more pink since they're still receiving light from the pink source. Light is also correctly blended where the two lights meet, forming a purple area.

Source code and comments

While this method does produce very impressive visual results, it can also be quite taxing for the framerate. Every frame we have to compare every light to every object in the scene and calculate shadows for each of them. In my sample, adding just one extra hull caused the FPS to drop by 60 frames. If you consider how sparse the scene is, you can already begin to imagine the problems you'd have with using this solution in a complex game.

I've attempted to optimise the code by batching all of the shadows into one draw call for each light, but even then the performance save was only some tens of frames per second. There may be other ways to increase performance though, so if you have any ideas then do feel free to share them. You should find an executable in the Release folder, which will need the latest DirectX 9 redistributable or SDK to run.

Credits:
George - Wizard Sprite
Studio Evil - Ground Texture

Source:
Sample Archive
DirectX 9 Redistributable
Tuesday 9 April 2013

Updates and Getting Started with DirectX

What I've been up to since my last update:

During late January and mid February, I'd organised a short internship at a local company to get some practical, hands-on experience with working in a professional environment making games. It was a great experience, the people I was working with were really friendly and it was nice to get an idea of how social a work environment can be.

I had a few tasks during my weeks there, but the area I spent the most time working on was a Pool game they had for Samsung mobiles. It was interesting learning a new development environment and spending time on a slightly different project than I was used to. Among some fixes for newer versions of Bada and some work on making a menu for achievements, I spent a lot of time creating an AI player so the game could be played by yourself. (You can see a video of the AI in action on the Portfolio page.)

Coming away from internship:

Microsoft XNA Logo
Around the time I was doing my internship, I became aware that Microsoft is effectively dropping XNA. Now while XNA isn't "dead" so to speak (you can still make games using it and there is an open source implementation called MonoGame) it prompted me to start considering how I want to proceed as a game developer.

Typically speaking, most console developers work in C++ for their game code and look for experience with APIs like DirectX or OpenGL, while mobile developers are more frequently using tools like Unity3D (a tool I also had some time with during my internship). Looking through job postings, it was very rare to see anyone specifically mention XNA experience as a desired quality.

As such, I made the decision that once I'd gotten my current project to a reasonable release state, I'd shift focus to either DirectX or Unity3D in order to continue my path as a game developer. Considering how much I'd been focusing on C# since leaving university, I was leaning towards DirectX so I could brush up on my C++.

Getting started with DirectX:

I found that getting started with DirectX was less straightforward than with XNA. XNA has an official portal with several tutorials and samples for beginners to look through, as well as hundreds of other tutorials available on the web. DirectX's main source of documentation is the SDK itself and its sample browser. That's not to say there aren't tutorials available for DirectX online, there are several, but don't expect it to be as straightforward as XNA.

The reason for that is simple. Where as XNA is a tool kit, which gives you a lot of boilerplate code to get started with, DirectX is a collection of APIs and expects developers to code for themselves. What does this mean in practical terms? Take this example. In XNA, when you create a new project you're given a game window with frame methods for Updating and Drawing your elements. In DirectX, you have to create that window yourself and specify all the functionality you want.

It's been quite the learning experience, though I feel like I've gotten a lot of helpful experience from it. Getting reaquainted with memory management is probably one of the more common areas I've spent time with. It's certainly useful to be able to delete a block of memory and know that it's gone the second the line executes. Another area I've had some time with is vertex management and shaders. I'd only recently dabbled with it in XNA, so it was interesting to see how similar it was in DirectX.

Some useful tutorials:

RasterTek "Multiple Light Shadow Mapping" Tutorial
I don't think I could have gotten as familiar as I am with DirectX currently if it weren't for these tutorials. These really helped break it down to simple, easy to comprehend chunks that allowed me to focus on what I was coding and fundamentally understand how it impacted the overall program.


What's happening next?

Once I've finished my current set of tutorials, I plan to make something very basic in DirectX which I'd always wanted to get around to with XNA. It will probably be more of a tech demo than an actual game, but it's something I originally wanted to include in Project Lead before I decided to move on.